Wednesday, December 9, 2009

Scrapbooking


This activity gives kids a structured way to be creative. Students take a sheet of colored paper, stickers, and pictures gallore and glue down to the paper with a theme! Mine features a trip to the beach in Oceanside and Carlsbad, California.

This activity could be used as a "thematic" scrapbook, for any topic in science, social studies, language arts, etc. Students can be as creative as they want with their assignments and keep them forever!

Monday, December 7, 2009

Pastel Landscapes


This fourth grade art lesson teaches students proper use of pastels, blending, shading, and utilizes creativity. Students learn what a landscape is and famous artists, such as Joseph M.W. Turner, who made these famous. Students select a picture of a landscape to create and begin with the sky, grass, and finally a "main point," such as mountains, the sun, clouds, trees, etc. Students blend, tint, and shade to create a realistic masterpiece! Students are not limited to their pictures, however, and encouraged to add, draw, or blend away until they create their desired landscape. Even the least artistic students can create a beautiful work of art with this activity.

An easy extension of this activity is in science or social studies. If students are learning about China they can be given pictures to blend of Chinese landscape. The same goes for mountain formation, lava in Hawaii, plate tectonics, river valleys, etc. Students could each draw separately and compare and contrast the Nile River versus the Missouri.

The Four Seasons Window


In this activity, students (Kindergarten through second grade) received a picture of a bare tree and its branches divided into four squares. We labeled each square by one of the four seasons. With crayons and watercolors, we discussed what the sky looks like during each season and colored or painted ideally.

The first "part" of the tree we worked on was Fall. We glued small bits of red, yellow, orange, and brown construction paper down to resemble fall leaves. For summer, we colored bold green leaves over the branches with marker and dotted red apples on with paint on Q-tips. Spring's square included scrunched up balls of pink and red construction paper to resemble apples on the apple tree. Finally for winter, we outlined the branches in glitter and placed cotton balls at the bottom to resemble snow.

This is a great lesson for Johnny Appleseed in social studies, an overview of the seasons in science, or a descriptive lesson for language arts. An extension of this activity would be doing the same thing, but labeling the snow, apples, grass, etc. in Spanish, French, German or any other foreign language (example: the sun: el sol). A similar diagram could be created with the body systems (digestive, nervous, respiratory, and cardiovascular) with modifications.

Wednesday, December 2, 2009

Printmaking


This lesson was introduced in two ways: cultural integration through holiday celebration and the historical importance of printmaking, which was used to first copy books. Students are given Styrofoam (cardboard would work as well) and Sharpies. Students use the Sharpies to draw a holiday design onto the cardboard. When they are satisfied with their design, they press it in with a tool or pencil. Students go over to the "printmaking" table, choose a color of ink, and roll their Styrofoam with a brayer covered in ink. Then, students take a piece of paper, place it over the painted Styrofoam, and roll with a clean brayer. Twenty four hours after drying, the result is a negative copy of the Styrofoam drawing! I created a gold palm tree during sunset with Christmas lights. We cannot forget those on the coast! Extensions of this include a history lesson, learning about other cultures, mnemonic device before test (review through repetition), or working with shapes and lines in lower grades.

Stepping into Art/Garden Stepping Stones


Students and kindergartners in this lesson create a "stepping stone" out of cement, beads, pictures, and other meaningful objects and media. Students begin by brainstorming patterns to make with their beads and pictures by drawing on paper. Then, with the help of a teacher, fill up their pie pans or whipped cream dishes with cement. The students lightly tap and shake their dishes to get the air bubbles out of the cement. Once that is done, students place pictures and beads on their stepping stone as they wish! Pictures are covered in lamination paper to prevent damage.

Students have an absolutely grand time creating their personalized stepping stones. The only down side is the inevitable mess from wet cement, which cleans up rather easily. A great extension of this lesson is science class and learning about rock formations. Students could take vocabulary words and insert things that go with the word into the stepping stone, or it is even great practice for spelling their names.

Drawing with Perspective


In this lesson for third graders, we review how perspective became a huge innovation during the Renaissance and its lasting impression in art. We practiced creating perspective, which is drawing things as you see them in real life (i.e. railroad going through mountains, roads to the sunset, sidewalks along buildings). First we started with making a vanishing point, a small dot in the middle of the upper half of the paper. We drew two slanted straight lines that met in the vanishing point, and creating buildings by drawing lines from there. This activity could be extended into mathematics if students are figuring out blueprints and the math going into that, working with lines, creating 3 dimensional objects, etc. It's a great history activity if students are learning about the Renaissance as well. It is difficult to get started, but impressive when students get the hang of it and exaggerate.

Creating Comics!


The most important aspect of this lesson is its versatility. In lieu of book reports, students can summarize their book. If students want to discuss the life of an animal, the parts of a cell, how the digestive system works, they can create a comic strip. The possibilities are endless: new vocabulary words, mathematics equations, story problems, how to play a game...

In this case, students (approximately third and fourth graders) reviewed vocab words including summary, point of view, and setting. With that in mind, students were given a list of topics to create a comic about. The artistic aspect comes in when students are asked to blend primary colors to create secondary, tint and shade, and add shading to shapes in their work. Students were required to make six frames in sequential order. We emphasized symbolism and expression in the comics to show how sometimes we need to look past just what the character is saying. This may not be ideal to use all of the time as a review or project, but a good one for many, if not all, of the students periodically. This lesson is designed for third/fourth graders, yet could be more or less detailed depending on the grade.

Wednesday, November 25, 2009

Native American Art


Students get to try their hand at Native American sand printing and patterns in this lesson. Students are introduced to various Native American patterns, which are generally very symmetrical. Students are given a piece of sand paper and white paper. Students create and color a pattern onto the sand paper. When they finish, and with the aid of a teacher, students iron their white paper over the sandpaper, printing or replicating the pattern on the sand paper. This is a great, fun way of incorporating Native American art into the classroom!

Me, Myself, and My Intials


Can you see the M.M.?In this activity, based on collage extraordinaire Pablo Picasso, students are asked to bring in either ten magazine ads or pictures of themselves from birth to present. Students take two pieces of construction paper and trace their initials on the first piece. Students then cut out so they are left with negative of their initials. Students then trace the negative outline on the second piece of paper. Students fill the tracing with pictures from magazines or their personal photos. Finally, the students glue their first piece with the cut-out initials onto the construction paper collage, so the collage shows through their initials. Teachers could do this with spelling words by having students write the word out and fill in with ads or drawings of what the word means or as a holiday piece.

Sketchbooks


In this activity, we painted a large sheet of paper any way we wanted. When it dried, we cut it in two pieces and glued it to card board and folded each over cardboard, almost like wrapping a present. Next, we evenly aligned the two pieces with computer paper. We then drilled 6 holes at the top. Then, we bounded it using a large needle and floss. The positive thing with this activity is students can completely personalize their sketchbook. Students may get frustrated with the actual binding, as doing it correctly is rather complicated. Extensions of this piece may include journaling, documenting experiments, and writing and illustrating a picture book. Teachers may even hand out worksheets in advance for a unit and students can bind them together to keep track.

Monday, November 16, 2009

Clay Day!


The clay activity was divided into three parts. In the first, we were blindfolded, the lights were turned off, soft music played, and we were read Pat Reese's narrative to go along with this activity. We were told to create whatever came to mind and release our energy into the clay. This routine is often used as therapy and may be a great way for calming students, gaining their attention, and subtracting competition. Next, we were allowed to simply play with the clay and to create something that's making sound, or motion. This was the most challenging. I began my own trying to create waves pounding on shore, yet it somehow turned into a beating heart. This added art elements. This project would make a great extension in a class such as physics, physical science, or biology for ages Kindergarten through college. Finally, we created pinch pots. This simple activity gave us the oppurtunity to combine all we did this semester as far as color, shape, texture, lines, etc. I created a star with the etchings of a sand dollar in the middle. In this case, we used Crayola air-dry clay, however in older groups, heat-baked clay would work and younger ages could utilize this with non-drying clay. The only con in this activity was clean up, as the clay tends to stick to the desk. However, this is a MUST for any age and any kind of student. This is a creative outlet for all subjects; students can form numbers, letters, problems, three dimensional projects, or even mold it while the teacher reads aloud to improve reading comprehension.

Etch-a-Sketch


In this activity, we traced a drawing we already had created onto this to create a neater version of what we had. I created the flower I love to draw. We traced the top of our original drawings with a wooden, leadless pencil. This took the ink on the etch-a-sketch paper off, revealing the negative version of our drawings. My flower features a green outline, though this paper comes in other colors such as blue and pink. This project was fun and relaxing, yet reshading the flower to make it look life-like again was challenging. This project would be great for students who are not confident in replicating their artwork but need practice. Extensions include tracing shapes or vocabulary words in other classes, or notes for that matter, for repitition and storing information into memory.

Sunday, November 15, 2009

Lynda Lowe: Lexicon Collages


Top left to right:
Amazing: Adjective: Causing great surprise or sudden wonder.
Confident: Adjective: Having full assurance and strong self belief.
Drupe: Verb: To hang low.
Metamorphous: Adjective: Changed in structure or composition as a result of metamorphism. Used of rock.

Inspired by artist Lynda Lowe's collaborative work with colleague Georgina Nehl's Lexicon collage, each person in the class was assigned four words. We were to personally define each word and paint, or use a wet medium, a background we felt described the word. We traded our work with our classmates. Our classmates and I added dry mediums such as chalk, pastels, charcoal, and oil pastels to elaborate and emphasize the words. We traded again and either found a representative photograph of our words in magazines or found one online to print make. Print making requires the artist to place their picture face down and paint orange degreaser over the image, then pressing down to transfer the image. Finally, we traded back for our originals to see what our class made of it. We were allowed to make any changes we wanted so we enjoyed our final pieces! Extensions of this project include making science "scenes" such as a grasshopper in its natural environment, learning vocabulary words, working as a team, and endless others. This project is great for inspiring others such as peers, learning in a unique, hands-on way, and finding a creative outlet. Some cons may come about if students disagree with what their peers decide to add to a project that may mean a lot of them, yet a teachable moment as far as conflict resolution goes. The project also requires considerable time, however can be tweaked to fit into the schedule. Overall, this is a great project to be used at any grade level for many things! Below are images and definitions of my 3 other collages.


Monday, October 19, 2009

Eric Carle Collage


This chameleon is inspired by Eric Carle's The Mixed Up Chameleon. Each person in the class created a poster of color. We shared our posters and created collages, similar to Eric Carle's method of creating his artwork. Students could use this to go along with any of his books. The only negative of this project is it is time consuming and messy, although if the teacher is prepared, no student will think this is a bad thing. Teachers could also have the students do an activity like this while learning about animals, space, adjectives, etc. Collages like this are a colorful way to learn about anything!

Safari in the Hallway!


Students in South Dakota live quite a distance from the nearest zoo, let alone safari. However, in this recent project, students can create their own safari in their hallway! Students in this activity use blue lines to draw exotic animals using simple lines. But not all animals are visible to the eye in the jungle. The students take warm colors, such as oranges, reds, and yellows to hid their animal. Only with special glasses they create can they see each other's creations, such as the one I created above. Teachers can use this activity to bring the jungle to the classroom. This provides an excellent chance to teach about different kinds of animals, creativity, colors, and work with both sides of the brain. A must for any level!

Monday, October 5, 2009

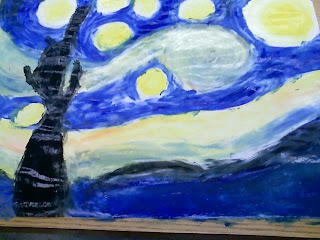
Starry Night


Vincent van Gogh

Starry Night

Our goal was to recreate Van Gogh's famous Starry Night by fingerpainting. We were required to include his infamous texture and bright, bold colors by mixing the primary colors and black and white for shading and tinting. Then we wrote our own stories that went with our personal paintings. Teachers could use a "become the...." in any subject to give the students a new idea in learning!

A boy was in love with a girl and he wanted to give her something special. The girl was special and did not believe in material things. The boy promised her the moon, stars, and the night sky. She said she would marry him if he could deliver this. He wanted to marry her so badly but could not think of a way to give her something so unreachable. He went to his favorite thinking spot on the top of a hill, overlooking the town they lived in. He was about to give up when he looked up and noticed the scenery. He ran home as quickly as he could to get his paint and canvas. He stayed up all night painting all of the beautiful things he saw for her. The next morning when the girl awoke, she found him sitting next to her bed with a painting. She was so happy with his gift to her that she agreed to marry him immediately. They lived happily ever after.

Elements and Principles of Design Composition


Shape and Contrast

For this composition, we were designed one element (shape) and one principle (contrast) of design. I choose stars as a shape. My main star in the center was created using yellow oil pastel with glitter. I surrounded the main star with smaller purple stars to really contrast the two colors. I then surrounded the smaller purple stars with the outline of pink, green, yellow, and turquoise in a way so their counter color would contrast them the best. I used a white and black background to really contrast the colors. The brightness of the colors appears to stick out the best of the black, yet as we can see the colors are brighter on the white side, thus effectively contrasting shape. This is a great art activity to get the students adjusted to the elements and principles as it incorporates group work, individual work, and creativity.

My Footprint


My footprint features my favorite theme: the beach. It represents my many trips to Oceanside, California, to visit my boyfriend while he was stationed at Camp Pendleton in the Marine Corps. I included a palm tree and several hibiscus flowers, my favorite tree and flower, respectively. I added my most recent hobby, a boogie board. The ferris wheel represents my hometown, Huron, South Dakota, home of the South Dakota State Fair. Finally, Semper Fi means "Always Faithful" in Latin; it is the Marine motto and my wink and nod to my boyfriend, Adam. I created this using oil pastel, glitter, colored pencil, and markers. This would be a wonderful activity to use as an ice breaker on the first day of school, as well as to gain ideas on what your students will enjoy as activities and to get to know them a little better.


Frida Kahlo

Self-Portrait with Loose Hair

Description: The Facts:

  • Lines: Hair, script, vines
  • Objects: Script, leaves, face, hair
  • Shape: Circles, formless blobs, triangles, squares
  • Textures: Leaves, hair, skin
  • Values: Warm colors (red and yellow), green, white, brown, black, bronze

Analysis: The Design

  • This is a self-portrait. She uses contrast with the bold red and yellow against an abstract black and white background. The contrast in shape is stricking as well. Frida is the focus of this painting.

Interpretation: The Meaning

  • She is documenting herself at a happy time in her life. She is 37 years old and in Mexico. She has bright eyes with a silent expression. In her other portraits, her hair is up in a tight bun, and by letting her hair down she must have been feeling relaxed at the time.

Judgement:

  • She uses great color in her dress. The red and yellow clothing against the tone of her skin is amazing. She let her hair down which causes the viewer to think she was happy and wanted to record her feelings. I enjoy her description of her portrait at the bottom as it adds a Spanish theme and beauty to the painting.